welcome to Piet
Years ago I came across this interesting article about unusual programming laguages and it opened a whole new world to me. Why use famouse programming languages that require years to be mastered when you can learn a completely useless language in a few weeks? Let’s say that they might not be as powerful as the most used relatives, but what they lack in usefulness, they make up in novelty (at least this is what I kept telling myself).
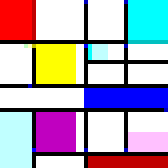
The language that caught my interest was Piet, because compared to the others looked so radically different. Of course you can use a language writing notes or white spaces instead of commands, but it’s just a matter of changing the worlds, they felt the same. No matter how far you go, maybe you have only 8 possible commands and your programs look like scary list of random characters (I will talk in the future about brainfuck, it’s very fun too), but you still have an ordered array of commands. With Piet everything felt different. This is a program I ‘wrote’ that calculates the first n numbers of Fibonacci
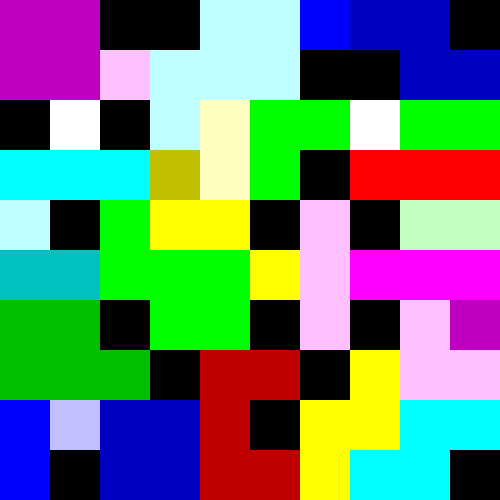
Fibonacci calculator
So, how does it do it?
Well, let’s start one step at the time…
(every information I am going to talk about can be found here or here)
Piet
Piet is a stack-based esoteric programming language (esolangs is such a cool name) based on sixteen functions. They are called esoteric because nobody actually uses them to write proper code :(, they are more of a joke or a “what if”.
Stack-based means that the memory is a stack of boxes, you can put new values in, remove them or do operations, some of which allows to reorganize the order of your variables. This allows to do potentially everything with a very limited number of functions, but at the same time you cannot access variables simply by their name like in any other programming language, so you need to remember the depth in the stack where every one of your variable is stored to be able to access it later. This is the boring part of Piet, and it’s shared by many other esolangs, such as Whitespace and more or less brainfuck. But let’s move on to the fun!
How do you write a function in Piet?

Piet palette
Let’s start saying that the program is a canvas of pixels. The interpreter will start from the top left and will read the canvas from color block to color block. The change of colors codify for the functions. There are 20 colors, 18 function-related plus black and white. Each of the 18 colors has a hue (red or cyan for example) and a lightness (simply light, normal and dark). Each function is represented by a change in this two parameters (the space of the two parameters is a cycle, so increasing the darkness of a dark colors give the light one). For example
sum = hue +1, lightness +0
which means that can be written in 18 different ways (here three examples):

It is possible to pass by one color to another without calling a function if there is WHITE in the middle. In this case the program will execute two sums and the change from YELLOW to CYAN is not executing anything

BLACK is used instead as a block, but to understand what it means we need to take a step back and explain properly what it means that the program is ‘moving’ inside the canvas.
As I said, the interpreter moves form color block to color block. To decide where to move exactly, it takes into account two global variables Direction Pointer (DP) and Codel Chooser (CC). DP is direction of movement and can be right, down, left, up.
DP mod 4 = 0: right
DP mod 4 = 1: down
DP mod 4 = 2: left
DP mod 4 = 3: up
When inside a block of color, the interpreter considers its edges and will move from the pixel that is furthest in the direction defined by DP. If there is more than one pixel with this condition, the choice depends on CC. Let’s imagine we are walking with the interpreter facing right
CC mod 2 = 0: leftmost pixel  (from interpreter point of view)
CC mod 2 = 1: rightmost pixel (from interpreter point of view)
In this example, the interpreter is on the CYAN block and DP = 0, so we are moving left-to-right. If CC == 0 we will move to DARK GREEN, otherwise to RED.

There are two functions that modify the directional variables, which increase DP (pointer) and CC (switch) respectively based on the number on top of the stack. The former is especially useful because allows to create if statement. In this example it takes one number as input, it negates it (if 0 -> 1, else -> 0) and it increase the DP based on the result, going straigth if the input wasn’t 0, or turning right if it was
input n :	DARK CYAN to YELLOW
not :		YELLOW to LIGHT CYAN
pointer :	LIGHT CYAN to RED

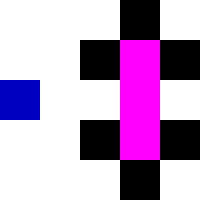
The last mechanic is the use of BLACK, which behaves like an edge. When the interpret face a stop of any type it increase the value of CC by 1 and it tries the same direction, if the path is still blocked, it increase DP by one (clockwise rotation) and tries again. If all 8 possibilities leads to a stop, the program ends. To achieve this we exploit the fact that only the two extreme pixels on the edge are used during navigation. A normal end command looks like this, once the interprets enters the magenta, all directions are tested and the program ends
We can now combine all the basic mechanics to draw a little program that keeps reading numbers, until if finds a zero, at that point it ends (when reading numbers, you can add them in the input box of the interpreter separated by spaces). So we can start with the same if statement used before, but when it finds a zero, it will turn right into the end statement, otherwise it will loop around jumping from corner to corner until it is back at the beginning
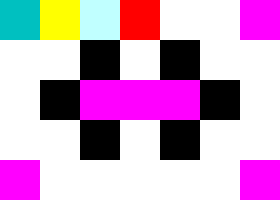
And this is what I find so cool about Piet! You can literally picture an if as a bifurcation of the code, and a cycle is a circle inside. You can visualize everything! And when the programs become more complicated it becomes a challenge to make everything fit and to cross thread in the proper way!
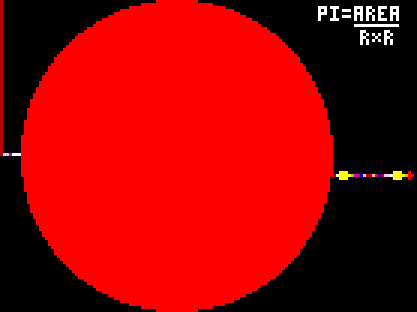
Other functions worth mentioning are roll which is needed to push n values from the top of the stack at the depth m, which is the only way to manipulate the stack (yep, this is the frustrating part ^_^). And there is push, which allows to put on top of the stack a number equal to the area of the current color block. This is useful in generatl to work on counters or other minor functions, but it can be used in a very creative way. In this program by Richard Mitton, the areas of the big red circle is pushed into the stack and then it’s divided by the radius twice to get an approximation of pi! And a better approximation is achievable drawing a bigger program!!
So, now let’s go back to the Fibonacci calculator! I drew a simplified version to highlight only the structure of the program without all the aesthetic and unnecessary pixels and colors (in this example the only time the size of the color blocks matter is when calling push)
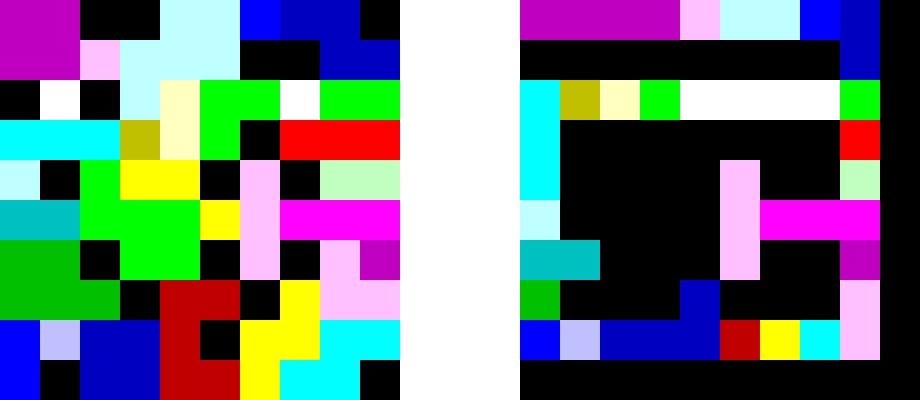
The first row is just to read the input and set up the stack with 0 and 1, which will be the first numbers for the Fibonacci sequence
push 4		4
dup		4 4
subtract	0
push 1		1 0
input num	n 1 0
At this point we are at GREEN on the righ side, we have the input number (which is our counter too) in first position and then two fibonacci numbers with the bigger in second position
dup		n  n 1 0
not		!n n 1 0
pointer
we are at MAGENTA on the righ side, pointer removes !n and turn right if !n == 0, which would end our program in the vertical line in the middle
push 3		3 n 1 0
push 1		1 3 n 1 0
roll		1 0 n
we are at CYAN at the bottom right, roll is only to put our counter at the bottom of the stack because we want to print the fibonacci number and generate the next
dup		1 1 0 n
output num	1 0 n
dup		1 1 0 n
push 4		4 1 1 0 n
push 1		1 4 1 1 0 n
roll		1 0 n 1
sum		1 n 1
push 2		2 1 n 1
push 1		1 2 1 n 1
roll		n 1 1
push 1		1 n 1 1
subtract	n-1 1 1
which leads us back at the GREEN on the right side with n-1 as a counter and the following two fibonacci numbers in the stack.
If all these rambling about a very niche programming language about colors has interested you, I really suggest to give a look at all these amazing programs!
And maybe try something out yourself! There are many online Piet interpreters that offer a range of features, such as step-by-step run of the code for debugging and an easy-to-use palette integrated with the respective function based on the current color. This is a very cool interpreter.
** There is only a bit of a disagreement on how the interpreter should behave once a WHITE is between a color block and an edge (or a BLACK). The official interpretation seems to be that the interpreter moves into the WHITE as if it was a color block and then wanders around. The other interpretation, is that the interpret stands on a color block until it finds a proper color to move to. Depending on how the interpret was written it could happen that some programs work on one, but not in another. In this case just add some BLACK immediately in contact with your colors and everything should work fine!